Showing posts with label Revit. Show all posts

Wednesday, June 26, 2013

Type Catalogs and MEP Parameter Syntax

The formatting of type catalog parameters has been consistent until the introduction of Revit MEP features. The WikiHelp at Autodesk provides insight into many things but it still doesn't tackle this subtlety yet. It does offer a number of sample entries, all without a bias toward MEP settings however.

The syntax for Common and Structure data types is parameter name##datatype##units
The syntax for MEP engineering data types is parameter name##discipline_datatype##units

MEP focused examples
Apparent Load##ELECTRICAL_APPARENT_POWER##VOLT_AMPERES
Flow##PIPING_FLOW##LITERS_PER_SECOND
Inlet Radius##PIPE_SIZE##MILLIMETERS
Voltage##ELECTRICAL_POTENTIAL##VOLTS

Structure and Common
MyStructuralParameter##FORCE##KIPS
Assembly Code##OTHER##
bf##LENGTH##FEET

Each MEP related parameter type begins with the discipline it is associated with. In other words when you create the parameter in the family which one of the available disciplines did you choose the parameter from?
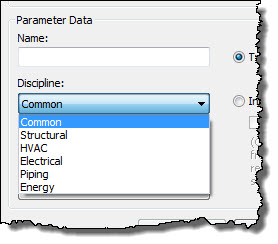
If you choose from Common or Structural it isn't necessary to specify them first. It seems to only have been added since the introduction of MEP categories. Another subtle difference is that you'll also find that MEP parameters use the underscore (_) instead of spaces between words in both the data type and the units used.

Examine the Discipline and Type of Parameter wording when you create a new parameter. When you are ready to create your own type catalog headers, refer to those again and as a general rule you can type:
  • Your parameter name
  • ##
  • Discipline
  • _ (underscore)
  • Parameter data type (with underscore between words)
  • ##
  • Units (with underscore between words)
When when I'm not sure what the correct format should be, I either open an existing family or create a new one from scratch that uses the parameter type I'm dealing with. Then I use the relatively new Export > Family Types feature to create a type catalog. If Revit makes it then it must be correct? Right? Better still using that feature can be a shortcut in itself, just clean out the extraneous parameters I don't really want to include in the type catalog. I wrote a post recently offering some advice on Working with Type Catalogs.

Saturday, March 30, 2013

What is Revit and BIM Resource

Alex Gore and his firm F9 Productions have created, as part of their company website, a resource for people that are just getting started with Revit and BIM or those who are still trying to decide what to do.

The site offers these items of interest:

  • A brief description of important modeling concepts
  • A PDF example of a complete Construction Documentation set
  • The Revit file of the above mentioned PDF
  • A 2012 Revit Residential Template to start your own creations
  • Links to tutorials for further help

A skeptic might read this and regard it as purely a marketing move. Alex's primary motive is to share the wealth with the community so to speak. For example a frequent question or concern people have is being able to see a completed set of documents. This is based on their fear, uncertainty or doubt that another software application, that is so intrinsically tied to how they make money, will truly be able to do what they need to do. So at the very least being able to examine their sample project and set may be useful, and if it is then the rest is "gravy". Have a look, see if you find something useful.

Monday, March 25, 2013

New for 2014 - Autodesk Presentation

Autodesk will host a presentation tomorrow at 11 AM (EST) via the web. If you'd like to see and hear what they is on offer for 2014 Revit products check it out. Once that's over I expect the blogging and tweeting will begin in earnest.

Wednesday, September 5, 2012

Revit LT

Autodesk has announced a new version of Revit that they are calling LT. It is the formal repackaging of the Autodesk Labs Project Spark. Users referred to it as a Revit Lite then and it seems Autodesk agreed with the branding.

When you visit the product site you will see it's being paired up (suite pricing) and compared with AutoCAD LT as well as the obvious comparisons with the full featured Revit. A number of posts and tweets have run down the list of things that it doesn't have. Chief among the features that are missing are worksets, design options, rendering (only through Autodesk 360), no export to IFC, conceptual massing, interference checking, and parts or assemblies. The intended customer is the small firm, small enough that no network licensing either is a detriment.

I worked for a firm years ago that this product could work for, a small office where each person did their own work for the principal. Sure, there were projects or design considerations that the missing features would prove frustrating but a single seat of full Revit would probably have covered it, collaboration with outside parties that is. I also worked for another guy once that it would fit perfectly but he'd never pay for it. Still using an ancient version of another brand and probably will until retirement. I have also provided support to small firms via my Revit Lifeline that LT could serve well. I can't help but wonder how they'll feel having paid for full Revit with a less expensive option now available?

It seems unlikely to me that Revit LT will truly serve any notion of BIM other than "lonely BIM". Then again it isn't uncommon to hear people working in the market LT is focused on saying something like, "BIM doesn't matter to what we do." The downside of that perspective is Revit LT may not either.

[Edit 9/6/2012: I received an email from Autodesk regarding Design Options. Revit LT is intended to include Design Options when it is released. It was not part of Project Spark so that information was carried over into the current press release and web site preparation.]

Wednesday, April 4, 2012

Happy Birthday Revit

A bit belated, meant to write something but didn't. Revit's 10th anniversary of joining Autodesk was on April 1st. There were several mentions of it on Twitter and in other blog posts. The 12th anniversary of Revit as a product is this year and the 15th anniversary of it getting started from scratch is in October this year.

Too cool not to echo, the Inside the Factory blog shared a great photo of the people who both started working with Revit before joining Autodesk and are still part of the product team! I imagine it can be hard to get them all in the same room at times. Congrats on another birthday and may there be many more, for both software and the people involved!


How many can you name?

Thursday, January 5, 2012

Vasari Back On Line

Just in case you missed it Vasari went "offline" for a couple weeks at the end of the year and the Autodesk Labs blog announced that it is available to download again. They had to deal with some licensing issues apparently so they pulled it so they could sort through that.

Go Vasari again!

If you missed it before they been running Vasari Talk sessions and you can CHECK OUT the previous sessions. The site says that they'll return in 2012 with more sessions so stay tuned.

Saturday, September 17, 2011

Dept. of Quirky - Baluster with Light Fixture

A thread at AUGI has been documenting the design process for the lair (currently called Project Sauron) of an as yet undetermined alleged evil Lord and Master (LaM). One of his designer minions (Mortimer, who also apparently uses Revit to do his work) has been posting images and asking questions. He recently asked about creating balusters that incorporate a light source. Since this minion has demonstrated pretty savvy skill with Revit already I suspected it was a loaded question, as in he has his answer but curious if anyone else has noticed. I guess whenever an evil Lord and Master is involved I get a little suspicious?

My first thought was a nested light fixture would need to be used and that it would need to be "shared". I thought shared because we have to nest multiple fixtures in a chandelier to create multiple lamp light sources...and they need to be shared for them to render. At least that's how I remember it. Turns out using a "shared" nested light fixture has a pretty weird outcome when used in a baluster and applied to a railing.


See the light light off to the left of the railing? That's the nested shared light fixture family. It's locked and aligned to the side of a baluster yet only one light fixture shows up...a little farther away from the baluster than I expected it to be. That and there's only ONE, despite the number of baluster you can plainly see. Even stranger is that I can select the fixture and move it independently from the railing. I can move it next to the railing, but there is still only one.

This time I made a couple changes. I remove the "shared" status of the light fixture and reload/rebuilt it all because Revit hates switching between shared and not shared status. The result is a bit more like what I expected this time.


Even better, it renders each fixture!


I hope the LaM treats his minion well after sorting this out?

If you'd like to see a video of the lair you can check it out at You Tube. It demonstrates some yet to be disclosed real time collaboration environment too.


And another...

Wednesday, September 14, 2011

Schedule Concepts - Calculated Values and Headers

Prompted by a few questions read at RevitForum.org and AUGI in the past few days I decided to record another short video. I used ducts and the notion of figuring out how much they cost based on a cost/ft scenario. The pricing you'll see in the video and screen captures are quite a bargain so you might want to rush out to buy some duct if you can get a supplier to match them?

The concept discussed in the video for calculated values relies on the stock Cost and Length parameters, Cost x Length. The assumption is that the price entered for Cost is the cost of the duct per linear foot (easily applied to metric values). None of this presumes it's the appropriate way to price them, the concepts can be applied to anything else.


The other concept demonstrated in the video is adding a group header to several columns in the schedule. The trick to getting a group header is how you go about selecting the columns. When you click in a header field Revit thinks you want to edit the value. You need to click and drag to select the other columns so you don't just select the column header you click on first...click and drag...then let go of the mouse button to finish. Watching the video is probably more "obvious". Not hard to do, just subtle. Kind of like learning to drive a manual transmission.