Showing posts with label Family Editor. Show all posts

Friday, August 30, 2013

A Doors Life

As I mentioned in an earlier post I presented a session called "A Door's Life" at the recent Central States Revit Workshop. It tackles creating a host door family that nests 2 panels, 2 frames and 2 handles. It also features a nested clearance form for clash detection and a variable plan swing angle. The host door permits rotating the 3D panel and hardware to any angle as well, though 0-180 is probably the range that's most useful.

If you are interested in more information this is the handout that attendees received (embedded here).


As the handout will tell you it isn't meant to be the perfect door. It's a demonstration of concepts and how to put them all together. If you're lucky you'll end up with something you can use right away or at the very least have a good idea how to get where you want to go.

Click to Download the completed files for each exercise.

Thursday, July 18, 2013

Three Laws - Family Content

This is repost of a post that I wrote in September 2008. I thought of it as I was working through some content tasks.

Not to be confused with Isaac Asimov's "Three Laws of Robotics", I first heard of the so called "three laws or rules" of software development from my father who spent many years working at IBM. These so called laws simply represented a philosophy about how to get something accomplished as efficiently as possible for the least cost (not always in terms of cash either). When I read Code Complete by Steve McConnell he mentioned the "Buy-vs-Build Decision" that developers should consider as they design/develop an application. It might seem radical to buy a solution when you are focused on making something yourself.

I've personally kept these in mind when thinking about content for Revit and even AutoCAD/ADT/Microstation before that.

Law One - Borrow
Law Two - Buy
Law Three - Build

Law One - Borrow
I can hear the cynic saying, "you mean steal". I'm sure that has happened too often. However the idea of borrowing what has been shared made the early adopters of Revit very special to me. Their willingness to make something that took them several, many hours in some cases, and make it available to others was and remains refreshing, altruistic. Guys like Chris Yearick (Yman), Scott Brown (sbrown) and Chris Zoog (czoog) to name just a few, their AUGI usernames in ().

Have you used the "All Windows" families found at Revit City? Chris Yearick (Living Places part of The Pilari Group) made those many years ago now and posted them freely at RUGIE (no longer in existence) and they found their way into the Revit City content as well as AUGI's Exchange and other places I'm sure.

Scott Brown (now with Beck Group) shared his office template as well as many standard office/product detail components and views which short circuited the time someone need to spend on their office template substantially.

Chris Zoog (now with HOK) started Zoogdesign and created a vibrant community resource for Revit discussion. It eventually merged into the Revit community forum at AUGI.

More recently an AUGI member known as CadKiller has made an ftp site available to share templates in the same spirit.

Law Two - Buy
There is something to be said for the education of making something yourself but if you can't perform billable work during that time it may not make economic sense to do it yourself. It may not make sense to have anyone in your employ do it either for the same reason. Worse yet all too often I find that a firm's different offices have made the same content themselves without realizing that someone in their own organization already made it or bought it. So communicating what is available is pretty important too...and another topic entirely.

Law Three - Make it yourself
Like I wrote above there is nothing quite like making something yourself for both satisfaction and reaching a fuller understanding of the Family Editor. At times this is the best solution or perhaps the only "affordable" way to get precisely what you want. Just be prepared to apply these same "laws" to how you acquire any knowledge you lack, maybe in a different order?

Here's to being "Law" Abiding!

Edit: Realized that the people mentioned are with new firms now, revised.

Wednesday, June 26, 2013

Type Catalogs and MEP Parameter Syntax

The formatting of type catalog parameters has been consistent until the introduction of Revit MEP features. The WikiHelp at Autodesk provides insight into many things but it still doesn't tackle this subtlety yet. It does offer a number of sample entries, all without a bias toward MEP settings however.

The syntax for Common and Structure data types is parameter name##datatype##units
The syntax for MEP engineering data types is parameter name##discipline_datatype##units

MEP focused examples
Apparent Load##ELECTRICAL_APPARENT_POWER##VOLT_AMPERES
Flow##PIPING_FLOW##LITERS_PER_SECOND
Inlet Radius##PIPE_SIZE##MILLIMETERS
Voltage##ELECTRICAL_POTENTIAL##VOLTS

Structure and Common
MyStructuralParameter##FORCE##KIPS
Assembly Code##OTHER##
bf##LENGTH##FEET

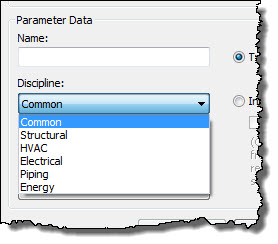
Each MEP related parameter type begins with the discipline it is associated with. In other words when you create the parameter in the family which one of the available disciplines did you choose the parameter from?

If you choose from Common or Structural it isn't necessary to specify them first. It seems to only have been added since the introduction of MEP categories. Another subtle difference is that you'll also find that MEP parameters use the underscore (_) instead of spaces between words in both the data type and the units used.

Examine the Discipline and Type of Parameter wording when you create a new parameter. When you are ready to create your own type catalog headers, refer to those again and as a general rule you can type:
  • Your parameter name
  • ##
  • Discipline
  • _ (underscore)
  • Parameter data type (with underscore between words)
  • ##
  • Units (with underscore between words)
When when I'm not sure what the correct format should be, I either open an existing family or create a new one from scratch that uses the parameter type I'm dealing with. Then I use the relatively new Export > Family Types feature to create a type catalog. If Revit makes it then it must be correct? Right? Better still using that feature can be a shortcut in itself, just clean out the extraneous parameters I don't really want to include in the type catalog. I wrote a post recently offering some advice on Working with Type Catalogs.

Monday, June 24, 2013

Pipe Size Parameter Usage

This is pretty subtle, when you try to add a shared parameter directly to a dimension (even to the "radius" in a connector), ie select "add a parameter" instead of selecting from the list available, it will tell you it has to be a 'length' parameter.


If you load the parameter first using the Family Types dialog as a pipe size you can then select it from the list.

Thursday, June 13, 2013

This Family uses a Type Catalog

A family that has a type catalog must be loaded properly, either with Load Family while placing a component or via Load from Library, or using a right click > reload in the Project Browser.

If you don't select at least one type from a catalog Revit will load the default type, don't do it. Select at least one type to reload or load. Don't drag and drop from Windows Explorer either.

A family that has a type catalog really ought to only have one "default" type. Lately I have settled on using the name: "This family uses a Type Catalog". If I find that type in a project I know it has been loaded at least once improperly. That type will never appear in the project if the catalog is used.

Do NOT use Edit Family (from inside a project) with families that have type catalogs, it puts all the loaded types from the project in the family. If you edit a family that uses a Type Catalog and it has a bunch of types "inside" it either wasn't cleaned up well or someone used Edit Family from a project. Related to this is, do NOT use Load into Project while working on the family, it does not look for or offer the type catalog and you end up with the default type in the project.

An earlier post included most of this but I decided it bears repeating, separately.

Tuesday, June 11, 2013

Family Templates and View Orientation

An exchange of posts at Revitforum.org with Alfredo regarding family templates prompts this post. The thread began with a question about orientation. I've written about this in the past. I was confused by the use of Exterior/Interior labels then.

I find a fair number of new Revit family editors seem to start out with door families. If that's your first foray into content you might starting thinking the top of the view is "front". It's labeled Exterior. I tend to think of the exterior side of a door panel as the front side when making one. This tripped me up for awhile. I wrote the post thinking the other templates were wrong when compared with the door template, at the very least different. Technically they are all the same, front is at the bottom of the page.

I recently examined every imperial family template (release 2014) that is used for 3D geometry. They all respect the notion of orientation where the bottom of the view is front, the top of the view is back, the right side is ride and left is left. Some templates have labels like Exterior/Interior and Placement Side. In the thread at RFO Alfredo noted that the Generic Model Adaptive template does not respect this orientation. In my view it does but when the template was created the front and back views were named incorrectly. The front view is really the back. If we examine geometry using the view cube we'll find every family will show the geometry the same way when we manipulate the cube.

He also mentioned the Profile Mullion template. They've provided labels to help orient yourself when you sketch your profile. In this image you can see that I've created a bullet shaped mullion profile and applied it to a curtain wall. The bullet ends up on the exterior side.


What is curious is that if the profile is not symmetrical the result is a mirrored condition when applied to the mullion in the project. That's a little unexpected.


If, in an elevation view, I place a detail section that looks up the profile matches what I see in the mullion family.


So we have to twist our perspective around a bit to get a sense of orientation. The short story is that mullion profile is a mirror of what we see in plan with respect to right/left orientation. Exterior and interior are displayed as the labels imply.

Definitely quirky...

Thursday, June 6, 2013

Scaling Revit Families

Every now and then there seems to be a convergence in the "Revitverse". A series of events, themes and user attitudes and desires emerges. Lately it seems to be the notion of scaling families. Revit has not permitted the arbitrary "make this 2x bigger" unless we could provide all the constraints and parameters that allow that kind of input and result. For example we don't usually ask for a desk or chair to be twice as large. A chair becomes too big to use if so. I believe that this logic prevailed in their choice to be more restrictive about scaling things as arbitrarily as other software allows.

A common thread in scaling lately has been classical architecture and columns. These are defined by ratios and rules to some extent while the sculpting applied to them seems to have much more freedom. Reading other blogs and attending the Revit Technology Conferences and Autodesk University made me plan to write a post that provides some links to the various places that you can find intriguing information on this subject. With the many bloggers focused on Revit it really didnt come as a surprise that somebody beat me to it. That someone is Mark Cronin, who I chatted with in Auckland at RTC. He wrote a summary of resources that you'll find useful, techniques that capitalize on new features as well as one that recalls a longstanding feature that we've all managed to forget about.

Please let me encourage you to read Mark's post for the details since he took the time to compile it in the first place, you really should.

Thanks Mark!

Tuesday, May 21, 2013

Revit 2014 Family Template for Two Level Relationships

The collection of Generic Model templates has grown a little bit with this new release, one new template called "Generic Model Two Level Based.rft".


Wednesday, May 15, 2013

Associate Family Parameter Button

Hey the little stuff makes me smile, what can I say? This little bugger has been a secretive button for ages and in Revit 2014 it gets real, it has a tool tip now!


Tuesday, May 14, 2013

Working with Type Catalogs

I recently replied to a question about type catalogs at RevitForum with this stream of consciousness set of comments. I thought it made sense to drop them here too since they mostly work outside of that of context too. I have altered (and added) a bit here and there to make more sense outside the context of that conversation. Here we go:

Many people like to use Excel to edit type catalogs though it is not required to do so and I usually don't bother. You can just edit the information in a text editor, Notepad ++ is a cool free one.

A Type Catalog does not technically need all the parameters that are part of the family, only the ones that vary from type to type. Values that are not in the Type Catalog will be passed on to the family from the default family type. For example you could put height, width and depth in the type catalog only if those are the only values that really change for each type. A type catalog can be quite simple to manage (without involving CSV files) when you only include the necessary values.

The new export family types feature is quite nice to make sure you have the parameters and units properly defined, especially for MEP content. It does not put parameters in a logical order, at least not one that I find satisfying. It also exports all the parameters in the family types dialog and I don't always want them all but it is easy to remove the ones I don't need.

A Type Catalog can include instance parameter values, these are the default value assigned to the parameter, the user can still change them once they are in the project, like any other instance parameter.

If 24 inches is a more useful input value than 2'-0" a type catalog will allow that even if the units in the family or project are assigned to feet and fractional inches. Just change the ##units from Feet to Inches.

Earlier I wrote that Excel is not necessary and that I don't usually use it. I do use Excel (and CSV files) to change column order because that IS a lot easier to do with it. A friend says that we can see the "matrix" when we look at the .txt file, so we don't need Excel. I save the work as a CSV file and then change the extension to .TXT. You have to delete the older txt file first. I don't bother to keep the CSV around. If I need a CSV again I just open the TXT type catalog file directly with Excel and set the delimiter options. Revit only cares about the .TXT file so no point confusing others with a pile of "irrelevant" files in the library folder.

I put the parameters (reorder them) that match the family type name in front of the list (first columns) in the catalog in the order of the naming in the type name, like 600H 800W 150D. So 600,800,150 are the very first values after the type name. I only include values that we want to set during loading and put dimensional values before informational values (text).

Related Family Interaction Advice

A family using a type catalog must be loaded properly, either with Load Family while placing a component or via Load from Library, or using a right click > reload in the Project Browser.

Do not use Edit Family (from inside a project) with families that have type catalogs, it puts all the loaded types from the project in the family. A family that has a type catalog really ought to only have one "default" type. Lately I have settled on using the name: "This family uses a Type Catalog". If I find that type in a project I know it has been loaded at least once improperly. That type will never appear in the project if the catalog is used.

Do not use Load into Project while working on the family, it does not look for or offer the type catalog.

Thursday, May 2, 2013

Project Unit Rounding Matters

Let's say for example that you need a metric dimension value in your family and it should be 6.35mm. Let's also say that the family's Project Units are set to zero decimal places. When you enter 6.35mm in the Family Types dialog Revit will round the value to 6.4mm.


When you change the family's units to show two decimal places the value that was stored in the parameter is still the single decimal value (6.4mm). Revit did not store the 6.35mm value but shows the rounded value instead, it stored the rounded value.


If you override the dimension style to show two decimal places (as shown above) but don't alter the Project Units of the family you can enter the correct value (in the dimension string) and the Family Types dialog will still report the rounded value. If you change the parameter value in the Family Types dialog it won't respect a two decimal entry and you'll see the dimension value return to a rounded value.

Short and sweet, if you really want a value like 6.35mm to be honored you need to set the family "Project Units" accordingly.

Fwiw, this is different from the project environment where entering a value that uses two decimal places is honored even if the project units and/or dimension properties do not.


Tuesday, April 23, 2013

Window or Door Frame Positioning

We quite often want to be able to move a window or door assembly back and forth within a host wall. This is easy to do as long as the assembly is moving "in" but doesn't need to move beyond the host in the opposite direction. A relationship between reference planes does not generally like to be reversed. We usually get yelled at with a message like this.


When we want the flexibility to move something from or toward something else we need to define an alternate reference point, reference plane in this case. If we place a reference plane in front of the exterior side of the host we can set it far enough away to provide enough room to move the assembly without generating an error message.


In the image above I can move the Frame Offset reference plane "outside" the exterior face of the wall by using a negative dimension value and toward the Interior by using positive values. The fixed dimension value of 12 inches defines the reference offset value I used in the formula column. This means when I enter zero for Frame Offset that the assembly will be flush with the exterior of the wall. Here's what it looks like using a negative 8" offset to move it outside, from the exterior face.


There are firms that use multiple walls to define the layers of what many people use one wall with layers for. When you place walls next to each other a door or window family is hosted by one of them. If you need to move the family "forward or backward" you need to be able to change the notion of what host reference plane is relevant. This is one approach to solving the problem.

Friday, April 19, 2013

Is it Too Late to Change

Whenever I spend time in the Revit Family Editor I run into past decisions. Sometime they are my own and quite often they belong to somebody else. I've always encouraged people to develop good habits when it comes to using and defining reference planes. I've even been teased about wasting time in a demonstration by naming each reference plane even though doing so wasn't pertinent to the topic. Habits...

I recently encountered a bunch of families that were built by a few people for their project. I was asked to make some changes so a part of the family could be scheduled separately. That meant making use of the concept of making a family "shared". A family that is nested into another is only treated as a symbol when we see it a project. A family that is nested AND Shared is loaded into the project as an actual separate family (appears in the project browser) as well as being visible as part of the host family. This special condition allows for scheduling nested parts as though they are unique parts, apart from the host, as well as permitting us to place them separately. This subject could easily be few separate posts.

While I was digging in I noticed that few if any of the reference planes were named. I also noticed that most of them did not redefine the original reference planes so that they made sense in the context of the family itself. By that I mean that people will use the default Center (Front/Back) or Center (Left/Right) reference planes as a "left" or "right" or "front" or "back" or something...but not rename/redefine them as such. That means that when we examine a family the "center" (the reference plane that Revit thinks is center) of the family is really an edge or side. Autodesk's own content isn't immune to this either.

In this situation I thought like a mechanic, if I've already dropped the transmission I might as well fix some things that I can't get to otherwise, or "while I'm in here"...

Sadly if a project is using this content and people have done things like put hundreds, perhaps thousands, of them in their models, bad things can happen, when they are reloaded. As Mr. Maller says... it can be a "screwtastrophe". Families that have dimensions referencing them in the project will generate the dreaded "dimensions must be deleted" messages as soon as you reload them. Specifically if you change the IsReference status of a reference plane and reload the family Revit can't find the original reference plane anymore. Worse a family might shift its location, particularly if being swapped out for a different version.

I don't think it can be overstated or stressed enough, content needs to be created carefully and good habits need to developed and observed. It may not be too late to make changes but it can be painful.

Thursday, April 11, 2013

Family Type as Type Catalog Flag

I don't see this technique used much but it is a pretty good way to let a user know that a family is supposed to be loaded with a Type Catalog. I was reminded of this by a thread at the RevitForum.org which also pointed to another thread at AUGI.

It's easy, create one "default" type in a family that uses a Type Catalog but instead of "default" use a more descriptive name like, "Family Is Not Loaded Correctly" or "This Family Uses a Type Catalog" or "You Should find the Type Catalog"... get the idea?

When you gaze over a list of families in the project browser you'll see that a family was loaded at least once without the type catalog because your "default" special name will be among the types listed there.

Tuesday, March 12, 2013

Blends have Two Sketches

From the been there done that department I bring you a little reminder, Solid and Void blends have two sketches; a base and a top. It's pretty common to see two sketches in the base and the user wonders why they can't move on to the top sketch. When the blend process starts Revit is thinking "base", regardless of the orientation of the blend you are making. How can you tell? Easy, there is a button for Edit Top.


That can only be appropriate if Revit thinks we are working on the base. There isn't even a button for Edit Base until after you click Edit Top.


Once you have two complete sketches, each in their own "world" (Base and Top), you can Click the Green Check mark for Finish Edit Mode. If you need to revisit one or both of the sketches you'll find you can go straight to the Base or Top Sketch via separate buttons, just have to select the form first.


Remember, two sketches, two, two are better than one or twice as nice.

Sunday, March 10, 2013

Reference Plane Order

This is subtle. When you draw reference planes the order they were created plays a role in how a parameter will move them later. Draw two new vertical parallel reference planes, draw one on the left and then next to the right of the first. Add a dimensions and assign a label (parameter) to the dimensions. Flex the parameter value and watch the reference plane on the right move. If you have a lot of reference planes it can get confusing but this underlying behavior is lurking there.

You can force certain behavior by pinning reference planes, locking dimension or using the EQ constraint to force them to move equally about a center reference line. Like I wrote, it is subtle. Just keep it in mind while you do your family editing.

Thursday, January 31, 2013

Keep Readable

Text elements have a property called Keep Readable. This prevents the text from being displayed upside down and reorients rotated text elements so they are "readable" from left to right and bottom to top. As soon as text transitions past 90 degrees and then between 180 to 270 you'll find the text flips to ensure that it is easier to read. All of this is true for text in a project view.


In a family the text elements share this parameter but it doesn't matter if you check it or not because the family governs whether text remains easy to read. This setting (Keep text readable) governs all text, even nested label families, in the family setting.


If you are working in the Family Editor you only need to worry about this one setting to force all text and nested label families to behave, so to speak.

Tuesday, December 4, 2012

Associate Family Parameter

I've written about Revit's sneaky buttons in the past (see the three links below). I find the button for the Associate Family Parameter feature particular frustrating.


First of all it's tiny and second it has no tooltip, both of which mean it is not particularly obvious. I find myself wishing for a different way to interact with this concept. I can't say that I have a better solution in mind. I just know that this one feels awkward.

Keep in mind that I'm coming from the point of view of someone who has spent about eighty hours clicking on those tiny buttons about a thousand times recently. There are many tasks in Revit that seem quite fine when you think of them as occasional activities. When you start to think of them as your 9-5 job, doing them over and over and over and over all day almost anything can start to wear on you.

Perhaps a clear cut button on the ribbon that says Associate Family Parameter and opens a dialog that lists the parameters that qualify. Even better perhaps a mapping methodology that allows us to define a series of native parameters and then map them to the nested family or the connector's parameters?

Here's links to three past Sneaky Button posts: POST 1, POST 2, POST 3

Friday, November 30, 2012

The Revit Family Guide

The family guide document that has been available for download is now part of Autodesk's WikiHelp site. The PDF is still available and has not been updated (that page at WikiHelp is the same) but the content and spirit of that document is now part of the WikiHelp site itself. Kudos to the ongoing effort of the team. Each time I return I find explanations that better serve us.

Tuesday, November 27, 2012

Rounding Length Values

When you create formulas in the Family Editor or perhaps in a schedule you can use the relatively new Round, Roundup and Rounddown options. They are designed to be used for unitless values. How often do we use unitless values? Click if you want to read the info at Autodesk's WikiHelp.

The other night I wanted to divide a panel height but round off the result. Take a door panel that has 6 lites that are defined by equal height from the top of the panel for example. One approach would be to just make the spacing equal. In this case the last lite is where the "slop" is supposed to go by making the upper lites equal in size. This means that the last lite is a little different size but then the bottom rail can be changed regardless of the lite sizes, without altering them.

The formula ended up looking like this:


In plain English, I add the top and bottom rail height together, subtract that from the panel height, divide by the number of lites. The rounding is applied to that result and divided by the desired rounding unit (1") and finally to satisfy Revit's quirkiness multiply the result by 1" to redefine what the units are. A bit round about (pun intended) but got where I wanted to go in the end.

Quick tip: When you add a parameter, click Apply before trying to fill in a formula. Revit needs to "save" the parameter before you can start using a formula in it. You'll typically get a message: "Can't find solution for formulas for type", wrote about this back in 2009.