Saturday, April 27, 2013

Revit 2014 Learning Links in New Sample File

I mentioned the annotation families that function as learning links the other day. I should also mention the corresponding schedule provided in the file too.

It is called "How Do I". The schedule is a list of all the "?" families that have been used. You can select one and use the Highlight in Model button to find where it is. The "What View" column lists the view you'll find it in too. They've included a column for "Reviewed?" so you can check each of them off as you work through each topic, nice for a beginner to track their progress. In the image below I added a column for "Learning Link" (URL parameter) which lets me click on the URL to browse to the WikiHelp topic right away.


Friday, April 26, 2013

2013 Central States Revit Workshop Registration

Registration for the next workshop opened 9 days ago, very sorry to be so slow to mention it.


Please let me encourage you to consider spending a couple days (August 15-16, 2013) at the Scott Conference Center in Omaha soaking up Revit information and wisdom. I attended and participated in a couple sessions last year. It was good fun, well worth your time and a great bargain.

Here are a few important links:
Welcome
Location
Schedule
Speakers

REGISTRATION

Come mingle with and hear special guest speakers Paul Aubin, Brian and Desirée Mackey (and maybe their BIMbino), Birgitta Foster, Andrew Jizba and Chuck Mies.

Thursday, April 25, 2013

New Selection Features and Keyboard Shortcuts

The new selection options that I mentioned earlier are accessible via keyboard shortcuts too by the way. This question was asked at a recent user group meeting but wasn't answered explicitly other than to say, "I think so". Well they can!

Wednesday, April 24, 2013

Tables of Data in Revit

One of the more subtle things that the new schedule features allow in Revit 2014 is creating a table of data that may not be tied directly to elements within the model. For example residential projects that I've worked on in the past were required to document how the proposed design or remodel fits within the property boundaries and required setbacks, or stated another way...zoning compliance. In the past I've written about creating tables using a family to accomplish this. Now we can do this, all within the schedule header itself (notice I used Comic Sans?).


The Revit Clinic posted an example of this for jamb conditions yesterday, check it out! These are the steps their post provides:

First, create a new schedule and either choose a category you do not have in your project, or alternatively filter the schedule so nothing displays in the body section.

Then under the Schedule Properties > ‘Appearance’ tab, un-check ‘Show Headers’. Now you unmerge the default title row and add additional rows, text, parameters, images, shading, etc. And you still get the specific control to resize the column and row dimensions.

Two tips:

First use the ‘Clear Cell’ tool to remove the default schedule view name. You can then use that cell to enter any data you wish.

Second, set up your cell sizes before adding new rows. The new rows will use the previous row for cell number, size and formatting:


Tuesday, April 23, 2013

Window or Door Frame Positioning

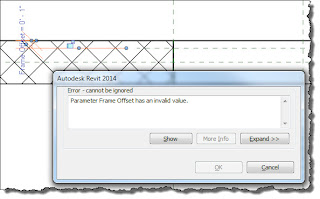
We quite often want to be able to move a window or door assembly back and forth within a host wall. This is easy to do as long as the assembly is moving "in" but doesn't need to move beyond the host in the opposite direction. A relationship between reference planes does not generally like to be reversed. We usually get yelled at with a message like this.


When we want the flexibility to move something from or toward something else we need to define an alternate reference point, reference plane in this case. If we place a reference plane in front of the exterior side of the host we can set it far enough away to provide enough room to move the assembly without generating an error message.


In the image above I can move the Frame Offset reference plane "outside" the exterior face of the wall by using a negative dimension value and toward the Interior by using positive values. The fixed dimension value of 12 inches defines the reference offset value I used in the formula column. This means when I enter zero for Frame Offset that the assembly will be flush with the exterior of the wall. Here's what it looks like using a negative 8" offset to move it outside, from the exterior face.


There are firms that use multiple walls to define the layers of what many people use one wall with layers for. When you place walls next to each other a door or window family is hosted by one of them. If you need to move the family "forward or backward" you need to be able to change the notion of what host reference plane is relevant. This is one approach to solving the problem.

Monday, April 22, 2013

Revit 2014 Sample File WikiHelp Links

After enduring the painful download, unpack and install process that literally took from Friday morning to Sunday night I got to run the shipping version of Revit 2014. It took over 30 minutes to open the first time, but AutoCAD took over an hour. I think there is something seriously wrong with my computer but all the usual things check out fine. I digress...

[Edit: I apologize if you read this before. I had View References on the mind, but these are just Generic Annotations. Thanks to Jeff Hanson for the reminder.]

The new sample file includes new help references.


These are Generic Annotation families that take advantage of the URL parameter to let you navigate to the WikiHelp page related to the features or elements that the documentation team placed a reference next to. Wherever you see a help "?" select one and then in the Properties Palette click on the sneaky "Browse" button (little button that appears with the ellipsis "..." at the right of the URL parameter field)


I wrote about using the view references before, to simulate a "next slide" arrow for presentations instead of using Power Point. View References do not have the URL parameter but Generic Annotation families do. Using the URL means we can do the same thing except browse to specific items on our network or elsewhere via the internet without storing the data inside the Revit model itself. These are not entirely new concepts since the URL parameter has been in Revit all along and View References are not new, but not very old...but it is a nice twist on how they are applied.

Imagine the office training project files pointing users to office standards or other code practices etc. Something to think about.

Friday, April 19, 2013

Is it Too Late to Change

Whenever I spend time in the Revit Family Editor I run into past decisions. Sometime they are my own and quite often they belong to somebody else. I've always encouraged people to develop good habits when it comes to using and defining reference planes. I've even been teased about wasting time in a demonstration by naming each reference plane even though doing so wasn't pertinent to the topic. Habits...

I recently encountered a bunch of families that were built by a few people for their project. I was asked to make some changes so a part of the family could be scheduled separately. That meant making use of the concept of making a family "shared". A family that is nested into another is only treated as a symbol when we see it a project. A family that is nested AND Shared is loaded into the project as an actual separate family (appears in the project browser) as well as being visible as part of the host family. This special condition allows for scheduling nested parts as though they are unique parts, apart from the host, as well as permitting us to place them separately. This subject could easily be few separate posts.

While I was digging in I noticed that few if any of the reference planes were named. I also noticed that most of them did not redefine the original reference planes so that they made sense in the context of the family itself. By that I mean that people will use the default Center (Front/Back) or Center (Left/Right) reference planes as a "left" or "right" or "front" or "back" or something...but not rename/redefine them as such. That means that when we examine a family the "center" (the reference plane that Revit thinks is center) of the family is really an edge or side. Autodesk's own content isn't immune to this either.

In this situation I thought like a mechanic, if I've already dropped the transmission I might as well fix some things that I can't get to otherwise, or "while I'm in here"...

Sadly if a project is using this content and people have done things like put hundreds, perhaps thousands, of them in their models, bad things can happen, when they are reloaded. As Mr. Maller says... it can be a "screwtastrophe". Families that have dimensions referencing them in the project will generate the dreaded "dimensions must be deleted" messages as soon as you reload them. Specifically if you change the IsReference status of a reference plane and reload the family Revit can't find the original reference plane anymore. Worse a family might shift its location, particularly if being swapped out for a different version.

I don't think it can be overstated or stressed enough, content needs to be created carefully and good habits need to developed and observed. It may not be too late to make changes but it can be painful.

Thursday, April 18, 2013

Download Manager

I started this process about noon today, this post is 8 hours later. In my opinion this does not define a good download experience :(


At 37,216 days I don't think the extra detail of 15 hours is worth mentioning? At this rate I'll be checking out the new features for Revit 2115? Oh, I may not be around in 101 years...drat, double drat! 

Sunday, April 14, 2013

Schedule Column Width

In my griping about schedules in my previous post I mentioned (in an addendum) that we get a new feature in Revit 2014 that provides some measure of control over column width. I decided it worthy of its own mention so here it is.

The Revit 2014 Modify Schedule/Quantities ribbon interface now looks like this.


When you select a column or columns you'll get this Resize button which will bring up a dialog, much like Excel does.


This means we can at least enter a specific value for column width. Yes we can make sure one column is exactly the same as another. We still have to travel from schedule to schedule to make it happen but it is more control.

Btw, bummer... in 2014 we've also lost the ability to "double click" on the vertical column boundary to automatically resize the schedule columns.

If you know you will need several schedules to report information but filtered differently you can save some time if you create the first and then duplicate the schedule, adding filters afterward. In some cases it might be less work to toss out existing schedules and duplicate/filter again than fixing the existing columns across all the schedules. Your mileage may vary

Saturday, April 13, 2013

Floor Perimeter

When you examine the properties of a floor you'll find Perimeter. Somebody decided perimeter shouldn't be available to tags so we can't tag a floor but we can see it in schedule (no, can't tag it in 2014 either).

If you alter a floor sketch to define an opening for something like for a stair or a mechanical chase, it alters the perimeter calculation. If you use either a Shaft Opening or Opening by Face it doesn't alter the perimeter value. Floor A is untouched, B is altered within the sketch and C has two openings one of each type. You'll see in the schedule that perimeter is not altered except where the floor sketch is changed to create the opening.


The moral of the story? If you'd like to be able to use the floor slab perimeter value then don't edit the floor sketch to create openings.

Friday, April 12, 2013

Fittings Do Not Look Right

A troublesome thread popped up at RevitForum.org the other day and DMapes came to the rescue. I haven't encountered this peculiarity before, and now that I know about it it's a bit surprising that I haven't. I guess I've just been lucky.

When you use the Underlay setting in Revit MEP you run the risk of altering the way your pipe fittings (duct fittings too in views using Detail Level: Coarse) scale and/or look. Here's a good and bad side by side.


The pipes on the left are good but those in the view on the right are smaller and halftone, as a result of using the Underlay setting.

Set to None the fittings look correct, but using the same level the fittings are associated with as the underlay equals sadness. It doesn't seem to mind if you use other levels as the underlay though. Careful with your underlay!

Thursday, April 11, 2013

Family Type as Type Catalog Flag

I don't see this technique used much but it is a pretty good way to let a user know that a family is supposed to be loaded with a Type Catalog. I was reminded of this by a thread at the RevitForum.org which also pointed to another thread at AUGI.

It's easy, create one "default" type in a family that uses a Type Catalog but instead of "default" use a more descriptive name like, "Family Is Not Loaded Correctly" or "This Family Uses a Type Catalog" or "You Should find the Type Catalog"... get the idea?

When you gaze over a list of families in the project browser you'll see that a family was loaded at least once without the type catalog because your "default" special name will be among the types listed there.

Wednesday, April 10, 2013

Revit 2014 Schedules Pending Gotcha

Revit has always treated the schedule view for editing as separate from the sheet representation, at least for column width adjustments. This always made sense to me. I should change the width of columns on a sheet where I can see the impact of the change. When I am editing a schedule and I want to see a bit more or less of a column I could change it freely without an impact on a sheet that shows the schedule.

Everything changes with Revit 2014 because when you change a column width in either place, a sheet or the view itself, it changes in the other. This is, as my Spanish speaking friends say, Muy Mal!! Ay Caramba! That's probably too polite?

I think it's safe to say that we've all wished for more control over column width from one schedule to the next. Imagine four door schedules, filtered by floor on separate sheets. Ideally we'd like the columns to be uniform widths from schedule to schedule. So we resort to tricks like an annotation family that provides the "columns" we want and we drag columns over until they cover the "column lines". Then we either delete the guide or "bury" it in a titleblock family with a yes/no parameter to control its visibility.

This enhancement does not help that situation and worse because of the legacy behavior and the assumptions that users will having as they begin to use 2014 we will see lot's of, "Why are my schedules changing constantly?".

Yes we can just create "working" schedules to deal with data entry and "sheet" schedules for documentation but it is unnecessary redundancy, we've got enough of it with other views already. I'm not looking forward to this "feature" getting in the wild.

Added 4/12/2013:
There IS a new Resize button for columns and a dialog appears that you we can use to enter a specific width. This means you can ensure that specific columns have the same width but it is a manual adventure, from column to column and schedule to schedule. It does work on multiple column selection so we can apply the same width to several columns at once. I believe the API does not provide access to this yet.

Tuesday, April 9, 2013

Language Flexibility

There are a few things that are hardcoded values that we can't do much about. For example the word "Grand Total" at the bottom of a schedule or "As Indicated" for view scale when used as part of a sheet's titleblock. The choice of words, the language used and formatting all  remain out of reach still after all these years. It would be excellent if these were added to project settings so a team could define what these should say. It's all part of refining the product itself and the documentation we produce using it.

Sunday, April 7, 2013

New Selection Quirks

Dan Stine passed along a couple thoughts after working with Revit 2014 in earnest. The new selection options Select by Face and Drag Elements on Selection can have some undersireable effects on your modelling experience. He wrote to describe these two situations:

Select by Face combined with Drag Elements on Selection is a “deadly” combination because you can much more easily start moving floors and ceilings.

When Select by Face is turned on you cannot select Rooms or Spaces. Ouch or maybe that's good, depending on what you are up to? I'll have to check to see if we can still TAB over the room tag to select the room.

Sometimes when we get things we ask for we also get some unintended consequences along with them.

Saturday, April 6, 2013

Modelling Serendipity - Revisiting an Old Post

In July 2009 I wrote about "Modelling Serendipity" when I encountered something that made me ponder my past work. Some recent conversations made me think of it again so I thought I'd put a link here to point at it again.

I recently told somebody, "I don't know what I don't know and I find that I bump into what I don't know in 3D faster than 2D"...that's modelling serendipity.

A RELATED POST (Sept. 2009), related to the notion of 3D shop drawings.

Friday, April 5, 2013

Choosing a Room Name

The Properties Palette lets us make some choices before placing elements that in the past were not possible. For example we can decide what elevation mechanical equipment or air terminals should be first. When we place rooms, without bothering to fill out a room schedule in advance, we can decide what name to use before we place one. In the image I've changed the room name to Office.


If we need to place several rooms that use the same name all we have to do now is type it into the room's name parameter within the Properties Palette. If you don't like the name you see when you place a room later, just check the Properties Palette. Revit remembers the last value you put there.

Remember that you can easily place rooms that are defined in a schedule but not yet placed in the model, just check the list!


Thursday, April 4, 2013

Get a Panorama on Your iOS Device

John Sepannen sent me this information recently. He wanted to get a panorama on his iPhone or iPad and came up with this workflow. His approach does involve 3 other software applications ($) that may or may not be practical for you, or there might be another option to use instead of Autodesk Stitcher.

1.   Autodesk Stitcher Unlimited ($350 single license or 30-day free trial)
2.   iPano app ($2.99) -
3.  Photoshop or equal
4.  Dropbox (or similar used to aid in transferring images to iOS device)

Using iPano allows anyone with an iOS device to view panoramic images (offline).

1.  Rendered view with Autodesk 360
       a. option #1 - render directly to panorama.
       b. option #2 - re-render any fixed camera image as panorama
2.  Download panorama file (right click on web thumbnail).
3.  Open panorama file "photo strip" with Photoshop and cut out (6) separate square image files .
4.  Rename image files based on relative direct of image facing the floor.
       image_u (up)
       image_d (down)
       image_f (front)
       image_b (back)
       image_l (left)
       image_r (right)

Using the Autodesk Stitcher Unlimited software

1.  File: Open: Panorama
       a. select any one of the six images.
       b. Stitcher will then process the six images and create a panorama
2.  Render Panorama as spherical image.
3.  Copy image to Dropbox
4.  On iOS device export image from Dropbox to Photo Library
5.  In iPano app - import image from Photo Library
6.  Save to bookmarks.

He shared a PDF slide deck that explains the process with images and more information if you are interested in pursuing this yourself.

Monday, April 1, 2013

Revit Technology Conference Info

This is an echo of my earlier post, which was quickly overshadowed by news about Revit 2014 features, just to give it a little more attention.


If you read this blog (regularly) then I think/hope that RTC is no surprise to you. I'm writing this as a reminder to those who already know about it as well as to introduce them to anyone who hasn't already heard about them. After all May and RTC AUS isn't far away now...

These are the events in the order that they occur this year:

RTC Australasia - May 16-18, 2013 - Auckland, NZ
RTC North America - July 11-13, 2013 - Vancouver, Canada
RTC Europe - September 27-28, 2013 - Delft, Holland


Each event gives you an opportunity to listen, learn, talk and mingle with many of the best and brightest people that our planet has to offer, seriously!

I attended my first RTC in 2006 in Australia, where it all started (in 2005). I've been a fan ever since and even became a committee member to help start the first RTC in North America in 2011. It isn't any single thing that made me a fan. It was the whole of the experience.

For example, I knew that every person I saw around me was like me, fascinated by Revit, just Revit then and now by what it has expanded into. I knew that no matter who I listened to, talked with or saw in a hallway that I'd see them again...in a session, in a few minutes or during a break or during dinner and drinks. The value of the social side of the event can't be overstated. People have cultivated great friendships, formed at each event, and these last and prove mutually satisfying for years to come. I can vouch for this personally.

If you struggle with getting your firm to support sending you, or if you are the firm, or if you are trying to justify sending your staff consider just the classes alone. If you or someone in your firm was charged with putting together a class of equal quality, compared with any you'll find at RTC, you can reasonably expect a 10-20 hour commitment. That's time spent preparing themselves, making sure they've covered every angle of Revit knowledge they need, then organizing it all, preparing to share it with other staff and finally actually sharing it with them. It might take longer if it is the first time they've had to do something like this, or they might not be knowledgeable enough yet to tackle it all themselves. If this same person attends RTC and returns home not only with the material from the dozens of sessions they attend but access to all the material for each and every class offered at RTC you'll have a wealth of material for FAR less cash outlay than devoting them to developing the same material in-house.

It isn't just the classes either. It's the interaction, the setting, the focus, the passion and excitement expressed by others and witnessed by everyone. You can't help but feel reinvigorated. You'll recharge your batteries so to speak. When you leave RTC you leave ready, ready for anything and eager to take it all back to the office. It's just a shame that you can't bring your whole office along to experience it for themselves...well you can...just not many offices will dare to. There are a few firms that do send as many as 10-15 staff as they see it as their annual training for key people. Do your best to attend the nearest conference, you and your firm won't regret it!

P.S. If you represent a Local User Group focused on Revit I'd like to help you get the word out to your members. Get in touch with me so I can pass along information that you can use to make it easier to talk about it at your next meeting.