If you happen to use Navisworks as well as Revit then you might want to visit Lee Mullin's post at Beyond Design, another Autodesk blog. Check it out!
Showing posts with label Navisworks. Show all posts
Showing posts with label Navisworks. Show all posts
Tuesday, March 26, 2013

Thursday, February 23, 2012
Ready Made Selection Sets for Navisworks
Want to save time in Navisworks when it comes to selection sets? Try exporting select views of the model to establish ready made "selection sets". We've already got natural organization with categories, worksets and filters doing some heavy lifting in our project. If we export several NWC files with just things like all the plumbing, HVAC, furniture, fin tube radiation, medical equipment, and so on, we'll have separate ready-made selection sets. Further finer grain selections can then be made by focusing on the separate files within Navisworks, if it's even necessary.
Sure that's what Navisworks is good at, selecting and searching for criteria but things are already pretty organized in a Revit model. Seems a waste of time to export a big pile only to want to break it down into smaller piles inside Navisworks? Want to run slash detection on pipes and ducts, just pick the two separate files as soon as they are loaded. If information doesn't get sent to us like this, we can just ask. If it still doesn't then we've still got Navisworks search ans selection sets in our back pocket.
Sure that's what Navisworks is good at, selecting and searching for criteria but things are already pretty organized in a Revit model. Seems a waste of time to export a big pile only to want to break it down into smaller piles inside Navisworks? Want to run slash detection on pipes and ducts, just pick the two separate files as soon as they are loaded. If information doesn't get sent to us like this, we can just ask. If it still doesn't then we've still got Navisworks search ans selection sets in our back pocket.
Friday, January 6, 2012
Hacking at Railings Again for 3D Grids
An exchange at RevitForum.org discussing 3D grids for 3D views or exporting to Navisworks prompted yet another "hackalicious" thought for Railings. I posted a VIDEO or this video so you can see and hear me discuss the concept. If you want to cut to the chase you can download the example project file (just scroll to the railing section on the page).
Aaron Maller shared some images (in the RFO thread) and concepts behind the line based families they've been using. Seeing them and reading the other posts made me think of railings yet again, because they don't mind curved paths and multiple segments. That and I'm not good with math that involves letters, weird signs or code.
The first thing I did was create a baluster family to show a grid name, using 3D Text. Then I created a profile for the "railing", just a thin rectangle "kick plate" to "trip" over in the model. Once they were loaded into the project I created a new type for each Grid name, you'd need a type for every grid name in the project.

With the the types established I'm ready for railing types. I just created a new railing type for each grid as well. Then it's click click click... adding the matching baluster type to the railing type. Yep, this is the tedious part. It's more fun once you get to sketch the grids...define "fun" though?

Like I said railings don't mind curves so here's a curved grid added in.

Last image is using "nicer" grid stands to identify them, more like the example Aaron showed at RFO.

Listen and Watch my video here?
In actual use, I'd start in a empty project file and link in the project file that has the governing grids in them. Then use Copy/Monitor to create equivalent Revit grids and put the 3D grids (hacked railings) on top, at each level of the bldg. Copy/Monitor let's me open my 3D grid file any time and see if there are any changes I need to be aware of. I just have to provide a new export to .nwc (or .dwg) any time there is a change, and pass along the new file.
Aaron Maller shared some images (in the RFO thread) and concepts behind the line based families they've been using. Seeing them and reading the other posts made me think of railings yet again, because they don't mind curved paths and multiple segments. That and I'm not good with math that involves letters, weird signs or code.
- By the way, several Dallas area based RFO members (Dan, Jose, Bob, Tanner, Aaron and me) got together for dinner last night and I mentioned it to Aaron so naturally I ended up writing this post tonight. We went to Taverna by Lombardi. Dan found it because I mentioned I was in the mood for risotto (yum!). Thanks to Dan for getting it organized! Sorry, I digress...
The first thing I did was create a baluster family to show a grid name, using 3D Text. Then I created a profile for the "railing", just a thin rectangle "kick plate" to "trip" over in the model. Once they were loaded into the project I created a new type for each Grid name, you'd need a type for every grid name in the project.

With the the types established I'm ready for railing types. I just created a new railing type for each grid as well. Then it's click click click... adding the matching baluster type to the railing type. Yep, this is the tedious part. It's more fun once you get to sketch the grids...define "fun" though?

Like I said railings don't mind curves so here's a curved grid added in.

Last image is using "nicer" grid stands to identify them, more like the example Aaron showed at RFO.

Listen and Watch my video here?
In actual use, I'd start in a empty project file and link in the project file that has the governing grids in them. Then use Copy/Monitor to create equivalent Revit grids and put the 3D grids (hacked railings) on top, at each level of the bldg. Copy/Monitor let's me open my 3D grid file any time and see if there are any changes I need to be aware of. I just have to provide a new export to .nwc (or .dwg) any time there is a change, and pass along the new file.
Friday, September 23, 2011
Point Cloud Data into Navisworks
Navisworks supports Leica (.pts .ptx) and FARO (.fls .fws .iQscan, iQmod, iQwsp) scan data formats as well as ASCII text formats (.txt .asc). I received a tweeted message the other day asking about getting the point cloud information from a Photofly session that resulted in .las and .pcg files instead.
Navisworks hasn't caught up with the recent addition of the .pcg indexed file format that AutoCAD and Revit use. It's a case of unfortunate development timing. It means that we can use .pcg files in Revit but we can't use the same files appended to a Navisworks session, we have to use something else. I've been starting with .pts files, creating the .pcg for Revit and then using the .pts in Navisworks. Your head hurt yet?
My suggestion to the twitter member was to import the .pcg file into AutoCAD and then Append that file into Navisworks. Navisworks will index the point cloud data when it reads the .dwg so you get the data despite the "unfamiliar" format. A workaround at best, but workarounds that work, work for me!
Navisworks hasn't caught up with the recent addition of the .pcg indexed file format that AutoCAD and Revit use. It's a case of unfortunate development timing. It means that we can use .pcg files in Revit but we can't use the same files appended to a Navisworks session, we have to use something else. I've been starting with .pts files, creating the .pcg for Revit and then using the .pts in Navisworks. Your head hurt yet?
My suggestion to the twitter member was to import the .pcg file into AutoCAD and then Append that file into Navisworks. Navisworks will index the point cloud data when it reads the .dwg so you get the data despite the "unfamiliar" format. A workaround at best, but workarounds that work, work for me!
Friday, September 2, 2011
Mastering Autodesk Navisworks 2012
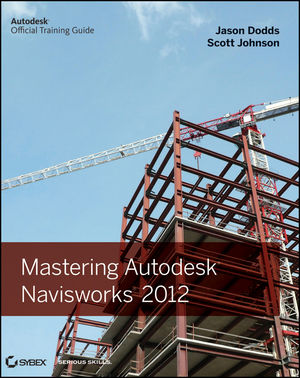
As I just wrote about Navisworks concepts yesterday. I should mention a great new source of information on the product. Wiley/Sybex just published the hard work of two Autodesk Navisworks guys, Jason Dodds and Scott Johnson. Naturally there is a host of people involved in getting a book finished but the guy they relied on to check their claims and recommendations is Michael Smith, their technical editor.

Jason has been supporting Navisworks for many years as well as in his current role as Autodesk Construction Solutions Engineer. Scott also toils at Autodesk, he's a Senior Technical Account Manager. These guys both get called in to make things work. Michael works for C.W. Driver as their BIM Manager in Pasadena, CA. These three together provide the necessary depth to get a book like this finished.
Navisworks can be learned pretty quickly, but it takes some time behind the wheel to really master it. As with anything you tend to learn enough to get by and probably don't really dig deeper. This book provides practical examples throughout in "Real World Scenarios" (a part of the Wiley/Sybex Mastering series format).
There is no shortage of settings in Navisworks and fortunately the guys took enough time to dig into even some of the more arcane stuff, with an eye toward what you are likely to need most of the time. For example in Chapter 4 there is a bit more than page dedicated to the subtlety of exporting from Revit with one option checked or not (Convert element Properties). Unchecked there are six properties exported and checked there are 18...that's just for a roof element.
You can read the Table of Contents and there are three sample chapter excerpts in PDF format; Chapter 2, Chapter 3 and Chapter 4. It's also available as a EPUB E-Book and Adobe E-Book. Here's the table of contents so you can review it directly. There's 456 pages from inside the cover to the back, including the index etc.
Table of Contents
Book Description
Author Information
Supporting Files
If you are a Navisworks person you'll probably want this in your collection, check it out!!
Jason has been supporting Navisworks for many years as well as in his current role as Autodesk Construction Solutions Engineer. Scott also toils at Autodesk, he's a Senior Technical Account Manager. These guys both get called in to make things work. Michael works for C.W. Driver as their BIM Manager in Pasadena, CA. These three together provide the necessary depth to get a book like this finished.
Navisworks can be learned pretty quickly, but it takes some time behind the wheel to really master it. As with anything you tend to learn enough to get by and probably don't really dig deeper. This book provides practical examples throughout in "Real World Scenarios" (a part of the Wiley/Sybex Mastering series format).
There is no shortage of settings in Navisworks and fortunately the guys took enough time to dig into even some of the more arcane stuff, with an eye toward what you are likely to need most of the time. For example in Chapter 4 there is a bit more than page dedicated to the subtlety of exporting from Revit with one option checked or not (Convert element Properties). Unchecked there are six properties exported and checked there are 18...that's just for a roof element.
You can read the Table of Contents and there are three sample chapter excerpts in PDF format; Chapter 2, Chapter 3 and Chapter 4. It's also available as a EPUB E-Book and Adobe E-Book. Here's the table of contents so you can review it directly. There's 456 pages from inside the cover to the back, including the index etc.
Table of Contents
- Chapter 1: Getting to know Navisworks.
Chapter 2: Bringing it all together: Files and File Types.
Chapter 3: Moving around the Model.
Chapter 4: Climbing the Selection Tree.
Chapter 5: Model Snap Shots: Sections, Viewpoints and Animations.
Chapter 6: Documenting Projects.
Chapter 7: 4D Sequencing with TimeLiner.
Chapter 8: Clash Detection.
Chapter 9: Creating Visualizations with Navisworks.
Chapter 10: Animating Objects.
Chapter 11: Give Objects Life and Action with Scripter.
Chapter 12: Collaborating Outside of Navisworks.
Chapter 13: Other Useful Navisworks Tools.
Book Description
Author Information
Supporting Files
If you are a Navisworks person you'll probably want this in your collection, check it out!!
Thursday, September 1, 2011
Navisworks File Formats
When I first started using Navisworks I found the explanation for how the three file types interact a bit awkward. I suppose it was just the language used at the time or perhaps something else, can't recall now. I did latch on to my own notion of what they mean and ultimately it's helped me to explain it to others.
There are three file extensions used .NWF, NWD, and NWC. I find it useful to describe or think of them this way.
NWD - This file is the result of "binding" all the data that you can see in the NWF file as well as any things you did to the way the model looks, like changing color or applying materials or adding lights etc. It's the file you can send to a client/owner or other team member to examine. You won't have to worry about them not having what they need to review the model. If you send them the NWF you'll have to make sure you send everything that is imported into it. Just Publish to NWD via the Output ribbon tab.
NWC - This is a special format that is used when an application's own format is not natively supported or acceptable to Navisworks, like Revit. Either the source application has an exporter, like for Revit, or Navisworks creates a .NWC file itself, after reading the source file you've chosen to Append.
Navisworks can load a lot of file formats directly.

You'll get pretty familiar with this format (.nwc) if you work with Revit...which if you are reading this blog...is pretty likely.
Note in the image that it possible to filter the type of files offered when you want to open or append a file. Choosing one or the other specific file type often trips people up later. They have .nwd selected and wonder where their .nwc or .nwf files have gone. Scratching of heads...and then, "oh right!". The bottom option is at least a bit easier on you because all three types are "acceptable".
There are three file extensions used .NWF, NWD, and NWC. I find it useful to describe or think of them this way.
- NWF = Navisworks "Working File"
NWD - NavisWorks "Delivered or PublisheD File" (emphasis on the D) NWC = NavisWorks "Cache or Captured" File
NWD - This file is the result of "binding" all the data that you can see in the NWF file as well as any things you did to the way the model looks, like changing color or applying materials or adding lights etc. It's the file you can send to a client/owner or other team member to examine. You won't have to worry about them not having what they need to review the model. If you send them the NWF you'll have to make sure you send everything that is imported into it. Just Publish to NWD via the Output ribbon tab.
NWC - This is a special format that is used when an application's own format is not natively supported or acceptable to Navisworks, like Revit. Either the source application has an exporter, like for Revit, or Navisworks creates a .NWC file itself, after reading the source file you've chosen to Append.
Navisworks can load a lot of file formats directly.

You'll get pretty familiar with this format (.nwc) if you work with Revit...which if you are reading this blog...is pretty likely.
Note in the image that it possible to filter the type of files offered when you want to open or append a file. Choosing one or the other specific file type often trips people up later. They have .nwd selected and wonder where their .nwc or .nwf files have gone. Scratching of heads...and then, "oh right!". The bottom option is at least a bit easier on you because all three types are "acceptable".
Subscribe to:
Posts (Atom)